Shadowrocket Guide
Add an existing server, choose a routing mode, then connect and verify access.
This guide follows the steps for first-time use. Prepare your connection details, then run a repeatable access test. The main steps take about ten minutes when everything works as expected. If you run into an authorization or connection issue, keep the current results and go straight to the relevant check instead of repeatedly deleting configurations.
Screenshots help identify pages and fields; they are not server details to copy. Entries in the interface may vary by installed version. Interface labels remain in English so you can find them in the app.
Step 01 · Prepare a connection entry
Add Server: Add or import
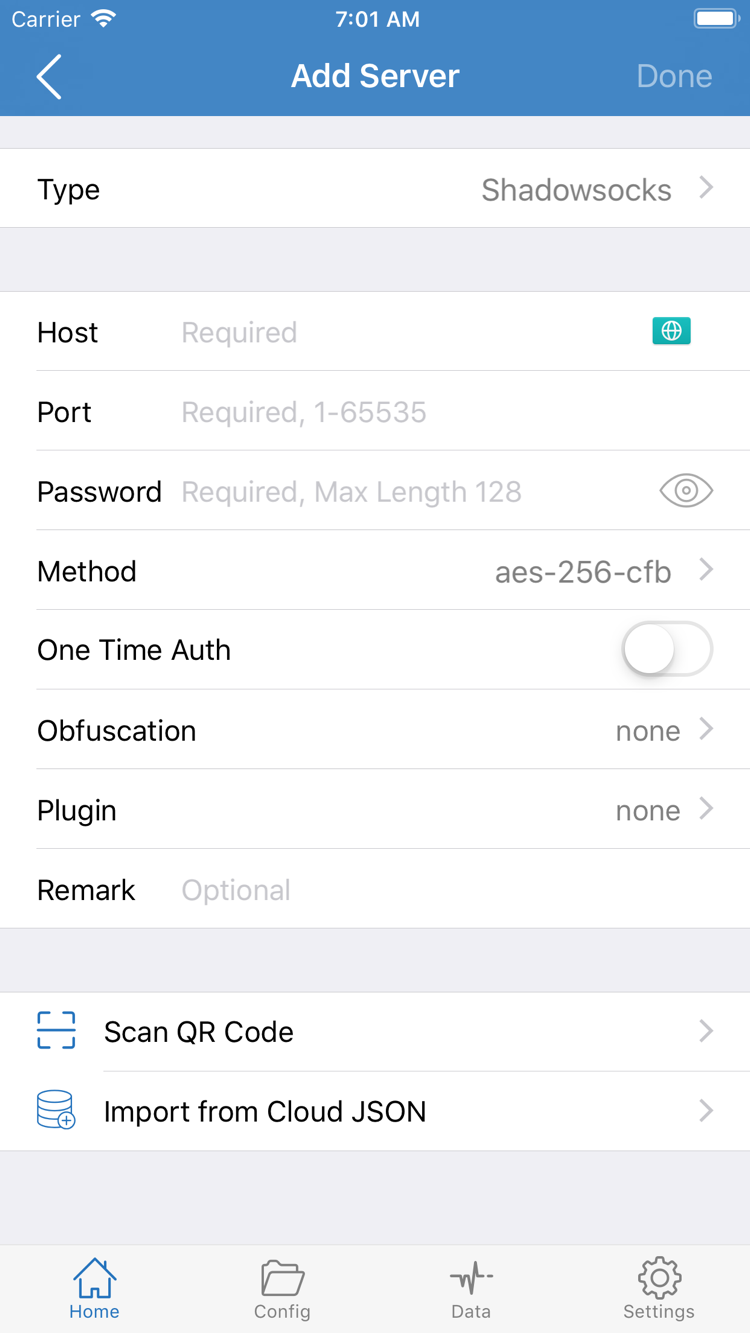
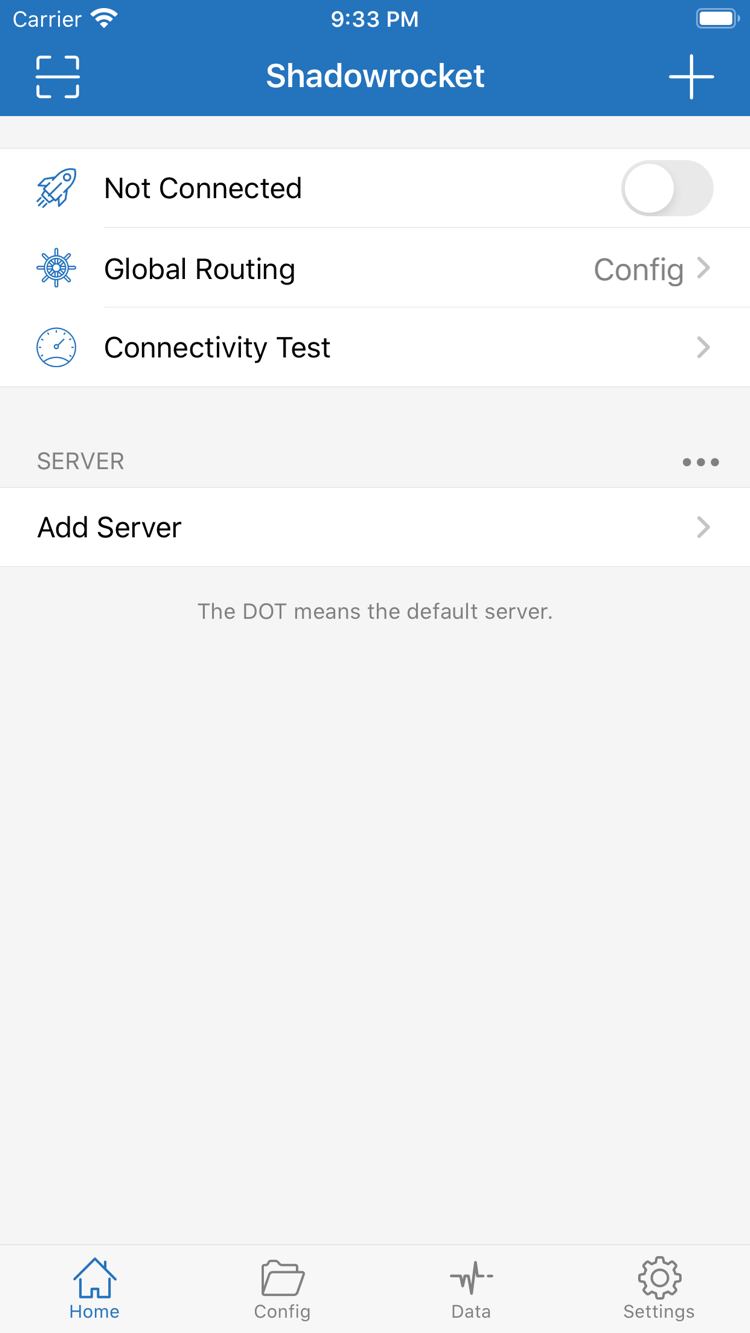
Open Shadowrocket and go to Home. Look for existing entries in the SERVER group. If none have been added, tap Add Server to open the entry form. First identify what kind of details you have: a protocol, server address, and authentication fields indicate an individual server; a URL used to retrieve multiple entries is a subscription address. Both can be used for configuration, but they go in different fields. Do not paste a subscription URL into Host.
Add an individual server manually
In Add Server, tap Type first and choose the protocol that matches your details, then fill in the fields below. Type determines which fields appear, so choose the protocol before entering information. For example, with Shadowsocks, check Host, Port, Password, and Method. Enter the server domain or IP address in Host, the connection port in Port, and copy Password and Method exactly from the details you already have. Do not include a webpage path, explanatory text, or extra spaces in the server address.
Authentication methods vary by protocol. Entries such as VMess, VLESS, and Trojan may require other identifiers, transport options, or TLS-related fields. Use the complete connection details you already have. Do not guess parameters just to fill every field, and do not mechanically apply one protocol's fields to another. Save the entry, return to Home, and confirm that it appears under SERVER and can be selected.
Import your existing subscription
If you already have a subscription link, choose Subscribe under Type in Add Server, paste the full URL into the subscription address field, and save as prompted. A subscription address may contain query parameters used to identify your account; keep the complete original address. Do not cut off anything after the question mark or post the URL in a public forum. Wait for the import to finish, then return to Home and check whether server entries appear in the relevant group.
The import is successful when server entries actually appear, not merely when a group name has been saved. If the subscription group appears but contains no entries, first check that the link is complete, the current network can retrieve it, and the service is still valid. Then update the group. Repeatedly adding the same address usually creates duplicate groups and does not resolve a retrieval failure.
Use a QR code or share link
If you already have a QR code, use Scan QR Code to read it. Allow camera access when prompted the first time. For an existing protocol share link, use the import option provided by the app and check the parsed Type, Host, and Port before saving. Import from Cloud JSON is another way to import data; use it only when your details are in the corresponding format. Do not try a random subscription URL there.
Complete just one of these methods; there is no need to use all three. Return to Home, select a server for this test, and note its name. In the next step, change only Global Routing and keep the server unchanged. This makes it easier to identify the cause if verification fails. See the glossary for more about the different link types.
Step 02 · Choose where traffic goes
Global Routing: Choose a mode
Once a server is available to select, return to Home and tap Global Routing. This setting determines the routing mode for the connection; it does not select a protocol. The three modes are Config, Proxy, and Direct. Understand what each one does, then choose the option you need for this connection.
Config: route traffic using the current configuration
Config handles connections according to the active configuration file. Rules may send some destinations through a proxy and connect to others directly, or reject particular connections. Selecting a server does not mean all traffic will go through it; check which rule matches the destination and which policy that rule uses.
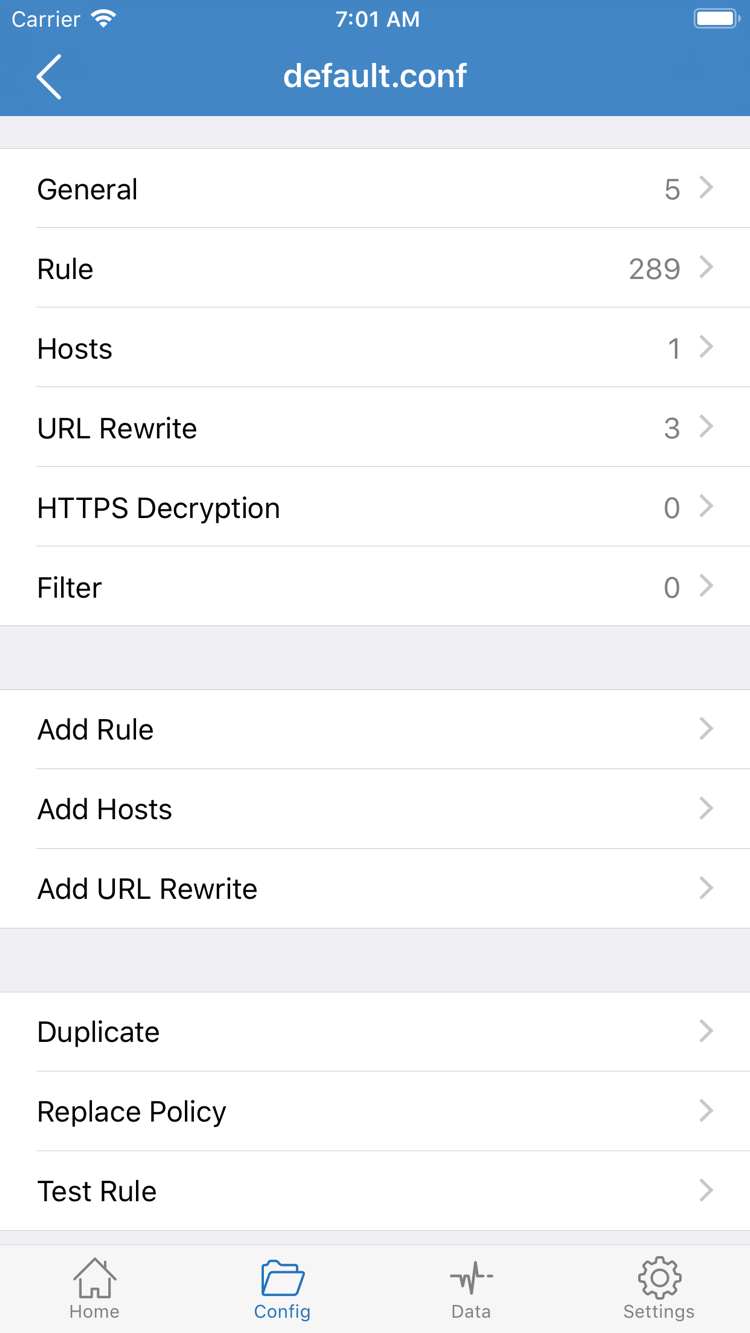
Switch to Config at the bottom of the screen to see the current configuration file, then open the file to inspect its contents. In the official screenshot, General, Rule, Hosts, URL Rewrite, and HTTPS Decryption are different sections of the configuration editor. Review rules under Rule; use Add Rule to add a rule. You do not need to edit every section when getting started, or enable HTTPS Decryption for ordinary connection tests.
Rules are usually matched in order, but the exact behavior depends on the rule type and configuration. The snippet below illustrates the syntax; it is not a complete configuration to replace your current file. example.com is a sample domain, and PROXY must refer to an available policy in the actual configuration. Do not copy a few lines over your current file without the complete configuration details.
DOMAIN-SUFFIX,example.com,PROXY
GEOIP,CN,DIRECT
FINAL,PROXY
Proxy: check that the server is available
Proxy sends proxyable connections through the currently selected server. It is useful for an initial server check or to compare results with Config. It cannot fix an incorrect password, an expired service, or an unreachable port, and it does not mean that every system connection from every app must use the same route. Before testing, make sure the server is selected, then switch the routing mode.
Direct: compare with a direct connection
Direct connects to the destination without forwarding through the selected proxy server. It can help determine whether the basic network is available, but it cannot verify that the proxy server works. If access looks unchanged after turning on the connection, first check whether Global Routing is still set to Direct instead of reinstalling the app.
For an initial check, use Proxy to verify the connection, then switch back to Config and check whether the rules suit your everyday needs. The routing mode is one variable in troubleshooting; note the original selection before changing it. See the user guide for a complete explanation of rule order, policy references, and configuration file management.
Step 03 · Establish the system connection
Home: Turn on the connection
Return to Home and check two things: the server you just added is selected in the SERVER group, and Global Routing shows the mode you intend to use. Then turn on the switch at the top. When disconnected, the page shows Not Connected. Do not mistake this status text for a server name, or assume that the connection is established just because a server entry has been saved.
Allow the system to add a VPN configuration
The first time you connect, the system may ask to add a VPN configuration. This permission lets Shadowrocket establish a system network connection; it does not import servers or fill in missing server details. Once you confirm that the request came from the Shadowrocket app you just opened, allow it and complete authorization with your passcode or system authentication as prompted.
If you canceled, the app may return to the disconnected state. Turn on the switch at the top again and complete the system prompt. Do not repeatedly add the same server. If the device is managed by an organization or restricted by the system, your current account may not be able to approve the permission. Check the device management requirements first instead of deleting unknown configurations to troubleshoot.
Return to Home and check the connection
After authorization, return to the app and see whether the status at the top changes from Not Connected to a connected state. Establishing a connection can take a little time, so do not toggle the switch repeatedly. If the status does not change, note whether an error appeared, whether system authorization was completed, and which server is selected, then continue with the troubleshooting steps below.
To check the system settings, search for VPN in iPhone / iPad Settings and review the relevant configuration and connection status. Menu paths may vary by system version, so using Settings search is more reliable than memorizing a fixed path. If you previously deleted the Shadowrocket VPN configuration, allow it again when prompted the next time you connect.
VPN status only indicates whether the system connection is established. It does not guarantee that the server can forward requests or that a particular website matched a proxy rule. Keep the server and routing mode unchanged for now, and verify access in the next step. If another feature that manages network connections is active during the test, check for a possible conflict and keep the original settings so you can restore them.
Step 04 · Cross-check the results
Connectivity Test: Check that it works
After connecting, run Connectivity Test in Home and wait for it to finish. Then use a browser to visit a service you are authorized to access. Do not assume the entire configuration is correct just because a test shows a time, the system displays a VPN indicator, or a page opens. The test method, destination service status, and routing rules can all affect the results.
Distinguish three kinds of evidence
A server test checks reachability using the selected test method; the system connection status confirms the VPN connection; and results from a browser or app show whether an actual request succeeded. Each answers a different question. If the server test passes but a webpage fails, continue by checking DNS, the destination site, and the rules. If a webpage opens but the server test fails, the test destination or method may not suit the current service.
Use the same destination and similar network conditions for verification. Keep the connection on, refresh the destination page, and try an actual action, such as opening another page on the site. To compare with a disconnected state, turn off the connection, repeat the same action, then reconnect and test again. A browser cache may keep a page visible after it has already loaded, so an old page remaining on screen does not mean a new request succeeded.
Check the actual route under Config
If access works under Proxy but not after switching back to Config, first check the active configuration file and the rule match for that destination. Use the app's connection records to review the destination domain, the policy used, and the result. Check whether the request used the expected proxy or DIRECT. The domain in a rule may differ from the domain in the actual request, and a page may request resources from additional domains. Do not infer the route for every connection from the browser address bar alone.
Changes in Data traffic can be useful as supporting evidence, but an increase in total traffic alone cannot prove that a particular destination went through the selected server. Background apps also generate traffic, and Config may use both direct and proxy connections. A more reliable approach is to match the specific access time with connection records and the selected routing mode, then check each item.
After verification, restore the mode you need for everyday use. If you used Proxy briefly to check the server, remember to switch back to Config. You can set up On Demand later if needed, but first verify a manual connection. This helps keep automatic connection issues separate from server issues.
Step 05 · Change one thing at a time
Settings: Troubleshoot common issues
If something goes wrong, keep the server and configuration file in place rather than starting by deleting everything. Describe what happened in terms of four things: the current network, the details you have, the selected routing mode, and the actual error. Then check the items below in order. After changing one item, reconnect and repeat the same access test. If it does not help, restore the original value to avoid losing track of the cause after making several changes.
No servers appear, or the subscription is still empty after an update
Return to the add steps and check that the subscription address has no missing characters, extra spaces, or line breaks added by a messaging app. Saving an address does not mean it can be retrieved successfully. Check the basic network and service validity, and review any update error. If your service provider changed the address, update the existing group using the new address you already have; there is no need to keep multiple copies of the same subscription. Verify account details only through an appropriate private channel.
The switch will not stay connected
First confirm that system VPN authorization is complete, then check that a server is selected. If there is a specific authentication or connection error, follow the prompt to check Type, Host, Port, and the authentication fields. Comparing Wi-Fi with cellular data can help distinguish a network issue from a server issue. Before using cellular data, consider your data plan.
Connection is established, but all destinations fail
Disconnect first and confirm that the basic network can access ordinary services. If the basic network itself is unavailable, resolve any network sign-in or signal issue first. Once the basic network works, use Proxy briefly to test the same server. If it still fails, check the service validity, server status, and protocol parameters. If you already have another usable entry, change only the server for comparison; do not change DNS and rules at the same time.
Only some destinations fail under Config
Confirm that the expected configuration file is active, then check the rule order and actual match. A broad rule near the top may prevent a more specific rule below it from taking effect. FINAL handles requests that did not match earlier rules. Do not delete all Rule entries as soon as access fails, or switch every connection directly to DIRECT. First identify which policy the destination actually used, then make the smallest necessary rule change.
Tests fail, or domain resolution is abnormal
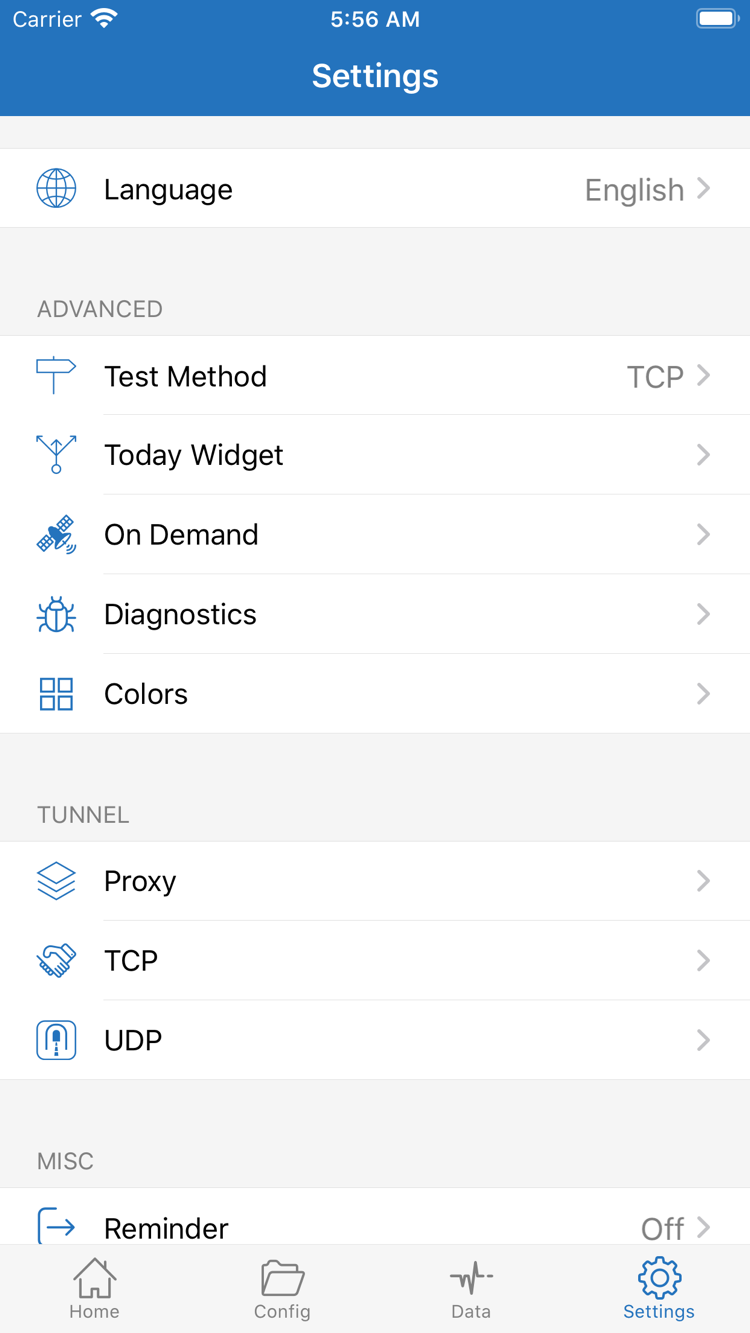
Open Settings and check Test Method. Different test methods measure different things, so a single result does not represent all app traffic. If you see a domain resolution error, note the current DNS settings and test the same domain again. If needed, restore a known working configuration for comparison. Do not enter several unknown DNS addresses at once, or disable TLS verification to mask a domain or certificate mismatch.
Diagnostics in Settings can help with further investigation. When reviewing the results, note the error type, network conditions, and the sequence of actions. Before sharing them, hide subscription addresses, authentication details, personal domains, and other sensitive information. Settings such as Proxy, TCP, and UDP affect different aspects of behavior. When troubleshooting for the first time, leave their original values unchanged rather than switching everything.
If the issue occurs only after the screen locks, the network changes, or the connection reconnects automatically, check the On Demand conditions and system network changes. First confirm that manual connection works, then troubleshoot automatic triggers. For more on permissions, subscription updates, and DNS, see Troubleshooting. To understand each English setting label, check the glossary; there is no need to change every advanced option while getting started.
Keep the verified configuration
After a successful test, note the subscription group, server, routing mode, and configuration file you used. When updating a subscription, check the results first. Entry order or names may change after an update, so confirm the selected entry again. Keep a recoverable copy before editing a configuration, and remember that it may contain personal server details. Do not share it publicly.
The next time an issue occurs, compare the current state with the last known working setup: has the network changed, has a subscription entry changed, or has the configuration file been edited? This helps avoid repeating steps unnecessarily. For a complete guide to permissions, Data, Settings, and routine maintenance, see the Shadowrocket user guide.